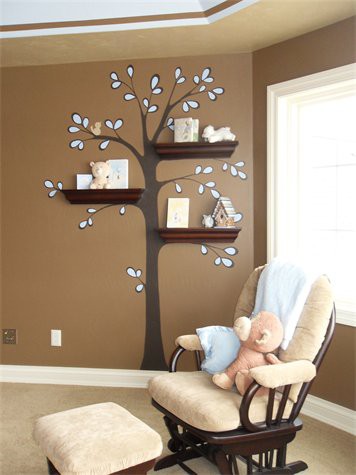
I have a confession. I am border-line obsessed with www.pintrest.com! It was there that I stumbled upon http://www.whimsicalwallmurals.com/Baby-Rooms.html. You see, I found my baby girl's new bed set and loved the bright flowers and country feel to it. I wanted to tie in that country feel with some loving touches here and there and adored this image (compliments of Whimsical Wall Murals):
The problem -- to my great disappointment-- is that I'm not an artist. But I thought, what's the worst that can happen? I can do this! As is my way, I made a checklist to get me started.
1. Pencil in abstract. You first need to figure our wear on the wall you want the tree to be. Where will it look best? (center, alligned right/left, etc...) How big/little will it be? Will it overtake the room if it goes all the way up to the ceiling, etc... After you answer those questions, lightly pencil in a box of how wide the branches should go and how tall it should be.
2. Start with the shelves. You can purchase floating shelves from The Christmas Tree Shop for $4-$12 or if you have some around the house that need to be re-purposed, this is the perfect opportunity! Pencil in where you want the shelves to be and consider the following questions: How do they look? How will they look with taller items on them? Are they out of reach of little hands? After you know where the shelves will go, trace them in pencil on wall.
3. Draw the branches. If you look at branches, they "branch" off into little "V's" that are thicker towards the base of the trunk and get thinner and thinner the farther out you go. With that in mind, draw branches around shelves and go up from there. Remember that the top of the tree should be fuller with leaves, but thinner "v's".
4. Draw the trunk. After you get the top of the tree drawn, you should be able to get a better idea of how wide the trunk should be. You want to widen the trunk ever so slightly the farther down the base you go.
5. Get painting! I painted with a very cheap brown acrylic paint from walmart ($2.00) and a foam brush ($.75). I essentially colored in the lines, while mimicking a vertical movement with the brush. Don't worry about all those extra pencil lines, I'll show you how to get rid of those! I painted the leaves in green with that same foam brush, purposefully making each leaf just a little bit different. Be sure to paint your shelves in that same brown mimicking a horizontal brush stroke (like a branch).
6. Erase the Pencil. After the paint is dry, erase the pencil marks. I started using toothpaste and while that worked and got the marks off the wall, I didn't like how minty it made that little room. So instead, I used Scrubbing Bubbles and rubbed the extra pencil marks right off! Note: Be sure to try scrubbing bubbles on an inconspicuous part of your wall first as I'm not certain if it'll take paint off. It didn't on mine, but who knows?
7. Hang the shelves & Decorate! It's important not to overload the amount of "stuff" on the shelves. Try to draw in colors from around the room that will pop out from the tree.
8. Enjoy! This is a sweet project that your child will cherish! It's cheap (less than $30 if you have to buy everything) and took me less than 4 hours and most of that was drying time. Best of all, it's okay to mess up! You can fit it in with your style by choosing different colors and going heavier/lighter on the paint/outlines.
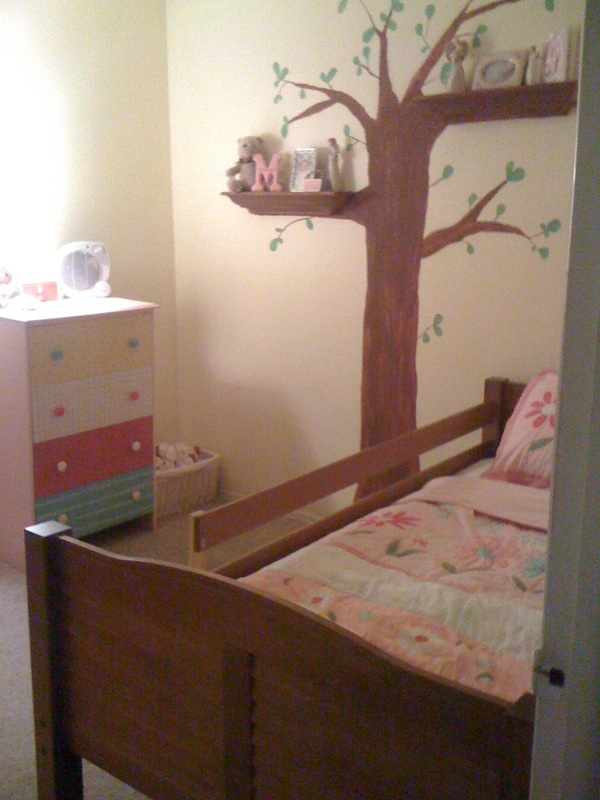
I'll post pics of Kenzie's tree soon!
1. Pencil in abstract. You first need to figure our wear on the wall you want the tree to be. Where will it look best? (center, alligned right/left, etc...) How big/little will it be? Will it overtake the room if it goes all the way up to the ceiling, etc... After you answer those questions, lightly pencil in a box of how wide the branches should go and how tall it should be.
2. Start with the shelves. You can purchase floating shelves from The Christmas Tree Shop for $4-$12 or if you have some around the house that need to be re-purposed, this is the perfect opportunity! Pencil in where you want the shelves to be and consider the following questions: How do they look? How will they look with taller items on them? Are they out of reach of little hands? After you know where the shelves will go, trace them in pencil on wall.
3. Draw the branches. If you look at branches, they "branch" off into little "V's" that are thicker towards the base of the trunk and get thinner and thinner the farther out you go. With that in mind, draw branches around shelves and go up from there. Remember that the top of the tree should be fuller with leaves, but thinner "v's".
4. Draw the trunk. After you get the top of the tree drawn, you should be able to get a better idea of how wide the trunk should be. You want to widen the trunk ever so slightly the farther down the base you go.
5. Get painting! I painted with a very cheap brown acrylic paint from walmart ($2.00) and a foam brush ($.75). I essentially colored in the lines, while mimicking a vertical movement with the brush. Don't worry about all those extra pencil lines, I'll show you how to get rid of those! I painted the leaves in green with that same foam brush, purposefully making each leaf just a little bit different. Be sure to paint your shelves in that same brown mimicking a horizontal brush stroke (like a branch).
6. Erase the Pencil. After the paint is dry, erase the pencil marks. I started using toothpaste and while that worked and got the marks off the wall, I didn't like how minty it made that little room. So instead, I used Scrubbing Bubbles and rubbed the extra pencil marks right off! Note: Be sure to try scrubbing bubbles on an inconspicuous part of your wall first as I'm not certain if it'll take paint off. It didn't on mine, but who knows?
7. Hang the shelves & Decorate! It's important not to overload the amount of "stuff" on the shelves. Try to draw in colors from around the room that will pop out from the tree.
8. Enjoy! This is a sweet project that your child will cherish! It's cheap (less than $30 if you have to buy everything) and took me less than 4 hours and most of that was drying time. Best of all, it's okay to mess up! You can fit it in with your style by choosing different colors and going heavier/lighter on the paint/outlines.
I'll post pics of Kenzie's tree soon!